
We have Power
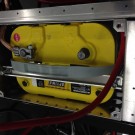
Electrical power that is. But first to finish up the garage heater upgrade details as promised from the last post. Cause I know how many of you are just itching to know all about my garage heating! As I mentioned last post I was adding a digital thermostat to the heater so it didn’t run all the time. To accomplish that I had to add a few things, 1) A digital thermostat 2) a 24V transformer and 3) a single pole 24v controlled contactor/relay. Originally, I was going to add the additional contactor and the transformer in a separate J-Box on the wall but after looking at the space in the bottom of the heater I figured out I could move the wiring tap and then I would have space to fit in the transformer and the contactor. In the pic below you can see the...
Heat Part Deux and More Wiring
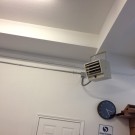
First off, I finally have constant heat in my garage. Last time I mentioned I was putting an electric heater in. It arrived from Amazon, only $400 and I hung it. I was contemplating wiring it my self but it needed a 240V line on a 40amp breaker and while I don’t mind running it I just really didn’t want to. So I called around and found an electrician to do the job for a reasonable cost. So last Tuesday he came out and ran the line and breaker. Boy was it cold in the garage while he was working and I was really glad I paid someone else to do it. It may look small put this thing puts out a ton of heat. As I’ve been playing with the thermostat the garage has been hovering around 70º since Tuesday. One modification I’m going to make is to add...
Heat
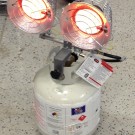
Well it’s been cold and warm here but either way it’s still cold in the garage. The garage is on the North side of the house so I don’t get the benefit of any heat from the sun. It makes it nice during the summer but not so much during the winter. I looked at having a gas heater installed in the garage but it was a bit more than I wanted to pay. Since it was a natural gas heater it was going to require a power line, a gas line and then a vent. For now I’ve gone with a propane heater. It works, takes about 2.5 hours to get the garage to a nice temp, so nice in fact that I was working in my t-shirt on Saturday. Problem is it has a little bit of an odor and I have to leave the garage door cracked a bit so I’m not overwhelmed by carbon...
Maui

Need I say more. First off let me say I hope everyone had a Merry Christmas. Well it’s been almost a month since my last update and I’m a bit overdue. Part of my excuse is that we were on vacation the first 2 weeks of December, in Maui, so you can’t hold that against me. We couldn’t have scheduled it any better. For those of you who live here in Denver you’ll know what I’m talking about, we had a bit of a cold snap on Dec 2. The same day we left and we missed it. Actually when we landed in Maui and turned on our phones the first message we got was the Winter Weather Advisory. Ok enough bragging about that. The other half of the excuse is that, as I just mentioned, it’s been a bit cold and it’s hard to work in the...
6-5-4-Is it the blue or red wire-2-

Ok well it isn’t that dramatic but it is very colorful. As mentioned in the last post I’ve finally gotten into the wiring. There’s really 2 main pieces here, first is the engine harness and second is the chassis harness. The engine harness came with the crate engine and connects to the ECU and all the parts on the engine. You might recall this pic from the last post showing the 3 connections to the ECU. You might notice in this pic that it’s relatively tidy. Well it was. And here is a pic of the chassis harness. This came with the car and provides for the main electrical connections of everything else in the car and it assumes certain basic things about the engine, some of which work with this particular engine and some of which have to...
More Miscellaneous and DOH!
The last couple of weekends have been about wrapping up a lot of little items with the goal being to get the engine bay panels out to the powder coater. Well I think I’ve got everything done that I need to. First on the list was to finish off the access panel on top of the driver side footbox. This panel is removable from the engine bay and provides access to the brake master cylinders. The normal way or the way the kit provides to attach it is self tapping sheet metal screws. Problem is I just don’t like the look of them. I’ve sorta had this theme going with everything that I’ve been mounting using Stainless Steel cap head screws. I like the look of them and it’s bringing a bit of consistency to the look of everything that’s...
Lots of Fabrication and Miscellaneous
I was out on vacation this week so I got a lot of time to spend on the car, not as much as I would have liked but still good progress. In addition to working on the car I also took care of some of our Christmas decorations. I’ll get to that a little bit later. After getting the engine set in place the first thing I took care of was creating some extra room on the drivers footbox where the head of the engine was hitting it. I cut a hole in the panel and the created a little pocket that I will rivet back in place creating the extra 1/2 inch I need to clear the head. Here’s the pocket I created to fill the hole. Here’s how it will mount in the hole. And here is the space it makes for the head clearance. It’s still tight but now the engine...
Recent Comments