
2 Updates in one weekend?!

Wow what a treat 2 updates in the same weekend. One might wonder what’s going on. Well it is Memorial Day weekend so first off, thanks to all those who served and made the ultimate sacrifice, thanks to all those who served before me, served with me and those who are currently serving. And with the 3 day weekend there was a lot of progress on continuing to knock out all the little things leading up to a big thing. When we last left off I had just finished fitting the roll bars and the rear body mount bolts. With those out the way it was onto cutting the carpet for the trunk. The kit doesn’t come with carpet for the trunk so I bought some carpet and had to custom fit each piece. This was easier done now then when the body is on as it’s far more...
Closer & Closer and a $250 mistake!
Well not to much all that exciting this post even though I’m a week or 2 behind. I’ve just been continuing down the punch list of knocking out a bunch of little things. Problem is they can chew up a lot of time. Though I did resolve 2 pretty major items if you consider brakes and leaking fuel major. While I had brakes during the first drive they were really soft and that’s obviously not going to work so I had to resolve that. While trying to bleed them again I finally noticed that the left rear bleed screw was oozing fluid even after closing it all the way. No matter how tight I made it, it just kept leaking. That was part of the problem with the soft brakes. After looking at it and finally taking it apart I realized I had made a $250 mistake....
She’s alive and she bites
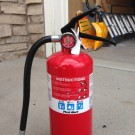
Well it’s all in the title. I’ve been promising a video for the last couple of weeks of the first start. To make up for being behind here are 3, one of the first start and 2 from the go kart. Safety first though. I had the fire extinguisher standing by just in case. But as you notice, and this was taken after first start, it’s still full. Ok onto the good stuff. Here is the first start. In case your curious this was the very first attempt to start her and she started right up. I was surprised as I thought she would be louder. And she bites. I guess that’s to be expected from a snake. I had to tighten one of the fittings and I forgot that headers get hot after running. DOH! After letting her warm up and come up to operating temperature we...
Vrooom Vrooom?
Well not quite yet. While on the march towards first start there’s still quite a few little things that need to be knocked out. My plan had been for first start to be last Sunday the 13th of April, but since it was going to snow I decided instead to focus on all the little things that still needed attention. Last time we talked about brackets and since I know how much everyone enjoyed that let’s pick up where we left off. With the brackets in place and holding everything it was time to start running the oil and coolant lines. The pic below shows where the two lines come off the oil filter adapter and run towards the front of the car. You can also just see the oil pressure sensor in the top of the image. This is the one the engine ECU monitors. I have...
Bracket 3 – I think we have a winner

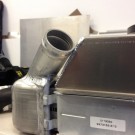
I made good progress this last weekend and think I’ve solved the fitting, mounting and fabricating of the new bracket, version 3 as I call it, to support the Oil Filter, Oil Thermostat and the Radiator Overflow Tank. Last time I showed you the new overflow tank and the template. Below is the test fit of the template in place, checking it for shape and clearances. And here is the new sheet of aluminum that I will craft the new bracket from. I’ve also had some questions as to how I’ve been crafting, cutting these brackets out of the sheet. I took some pics through the process to show everyone how I go from this sheet to the final bracket. I start out with a combination of the template and measurements. I then layout the bracket on the sheet using...
Set Backs and Do-Overs
Over the last 2 weekends I had hoped to wrap up the cooling system and the remote oil filter, oil thermostat and oil cooler and thus be ready for first start. Well that’s the direction I was headed until I ran into a few issues which resulted in the set back and a do over or two. But let me start you at the beginning. Last week Saturday I started working on relocating the oil filter. This went pretty smooth. In the pic below you can see the stock location of the oil filter on the driver side of the engine under the alternator. I want to relocate the oil filter for a couple of reasons, one being that I can run a larger filter and two being that since I’m also going to run an oil cooler I need to run oil lines anyways so I might as well move it. In this...
Final Assembly
Well I’ve started final assembly and am permanently attaching things to the car. But let me bring you up to speed since the last time I rambled. After wrapping up the electrics and testing what I could and then finishing the parking brake, Destinée and I started the tear down and pulled the engine. I needed the engine back out for a couple of reasons. First and foremost there was no way I was going to be able to mount some of the foot box panels with the engine in. Another key reason was that I had to pull the transmission off and change the flywheel bolts. Turns out the the original flywheel bolts are what are called torque to yield bolts which translates into one time use bolts. I had removed the bolts to install the backing plate for the bell housing and...
Recent Comments