
Front Suspension, Diff, Pedal Box
Well it was a busy weekend and I got a bit done, so strap yourself in this is a long one.
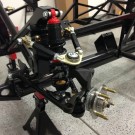
First off, the front suspension is done as you can see below, trust me the other side is done also. Here you see the drivers side front suspension. It consists of the upper and lower A arms, the coil over shock (the red shock with the spring wrapped around it in the center), the spindle and hub (the part in the bottom right corner with the goldish bolts, or wheel studs sticking out of it). What’s not on there yet are the brakes as they are still on order. It’s also not connected to the steering rack yet but that’s another step. In case you’re wondering what the ring, looks like a gear, behind the hub is – it’s the tone ring for anti-locking brakes. The hubs come from a Fox body Mustang and that’s why the ring is on there. Yes, putting ABS on the car is an option and some people have done it. I haven’t decided yet if I want to or not.
The next step would be the rear suspension but I’m still playing “Let’s see if we can ship the right parts this time” with Factory Five. Not that big of a deal really since the differential and the spindles aren’t ready yet, more on that in a bit.
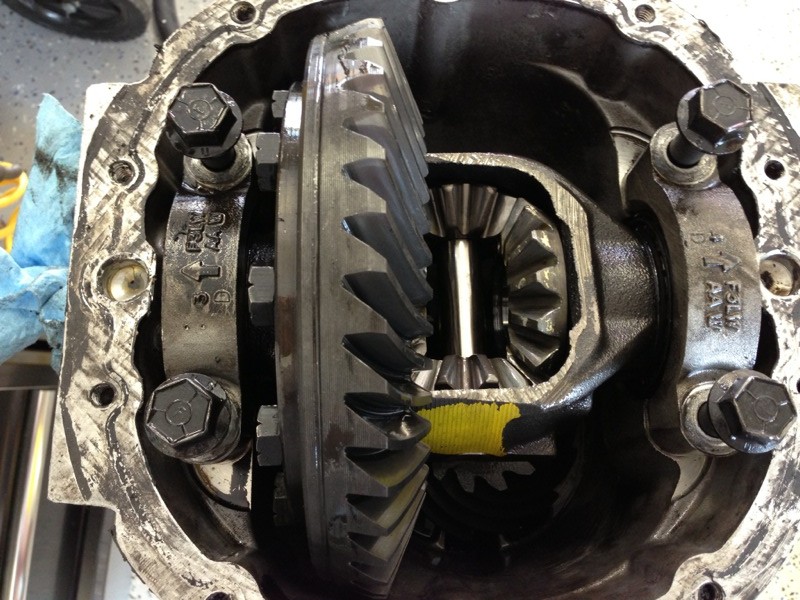
With the front done and no parts for the rear, I tore down the differential and the rear spindles. Truth be told I have to do this before I can put the rear end together anyways. The next pic is the back of the differential with the cover removed. I forgot how much 90W gear lube stinks. If you don’t know let me know and you can come over and enjoy the aroma. Caroline was really happy with that smell in the garage. Here you can see the ring gear (big gear on left) and the spider gears (center of pic, 3 gears forming a square, there’s a forth one in there but you can’t see it) that drive the axles. The axles come into the left and right sides of the diff. On the bottom just below the yellow spot is the pinion gear that comes in the front of the diff. It connects to the drive shaft and drives the ring gear, it and the spider gears spin around inside the case while you’re driving. As long as you’re going straight the spider gears don’t turn, but when you go around a corner they compensate for the fact that you’re tires are then moving at different speeds. I’m removing all of this and replacing it with a limited slip unit. The difference is that this unit sends all the torque to the wheel with the least amount of traction. Whereas the unit I’m putting in, also known as a posi, will transfer the torque to the wheel with the most traction. I’m also changing the gear ratio which is set by that ring and pinion gear. This happens to be 3.07:1 set. This means that for every 3.07 turns of the pinion gear or input from the engine, the ring gear and therefore the axles make 1 turn. I’m changing mine to 3.55:1, the ratio works better with the engine and transmission I’m using. All I needed from this unit was the case and cover.
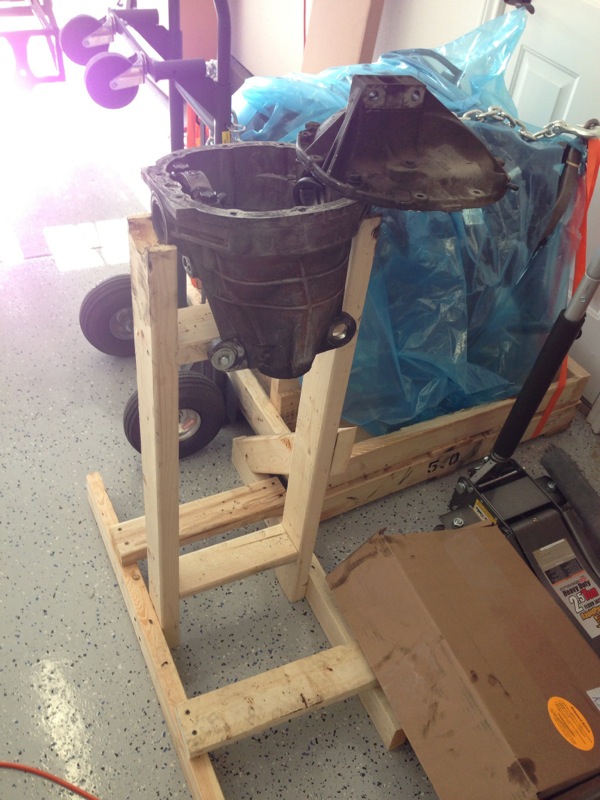
Here is the whole unit on a quick stand I threw together to work on it, cause while the case is aluminum and quite light the gears are all steel and make the whole unit rather heavy. At this point I’ve removed the gears and you see the cover hanging off to the right side. It now needs to have the bearings and seals removed. Once those are out then it needs a good cleaning and all the new parts can go back in. I’m debating if I take it to a shop to have it done or do it myself. I’ll let you know which side of my head wins that debate.
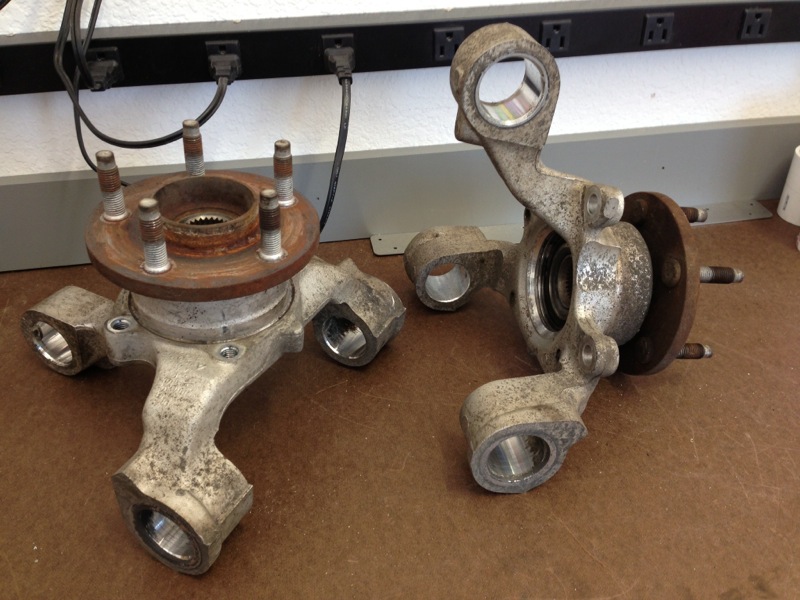
I also got the rear spindles as far as I could go with them. The pics below are the rear spindles, these are what the rear wheels attach to. The 3 big holes in each are where they attach to the suspension and the rusted round part with the bolts sticking out of it is the hub and where the wheels attach. You can also see in the right one in the center of that part is where the axle goes and thus drives the wheels. At this point I’ve removed the backing plates and the upper and lower rubber bushings. They were pretty much trashed and I will replace them with polyurethane bushings. The hubs, the part with the 5 studs sticking out of it, need to be pressed out and the bearings that the hubs ride in also need to be pressed out. I can’t do this part because it requires a 20 ton press to get them out and press new ones back in, so it’s off to a machine shop to have that work done. I’ll replace the hubs and the bearings because the hubs have the wrong bolt pattern and these bearings are also shot. I also broke one of the backing plate bolts so that will need to be removed. They will also be able to clean them up a lot easier than I can do at home. When that’s all done they should look like shiny new units.
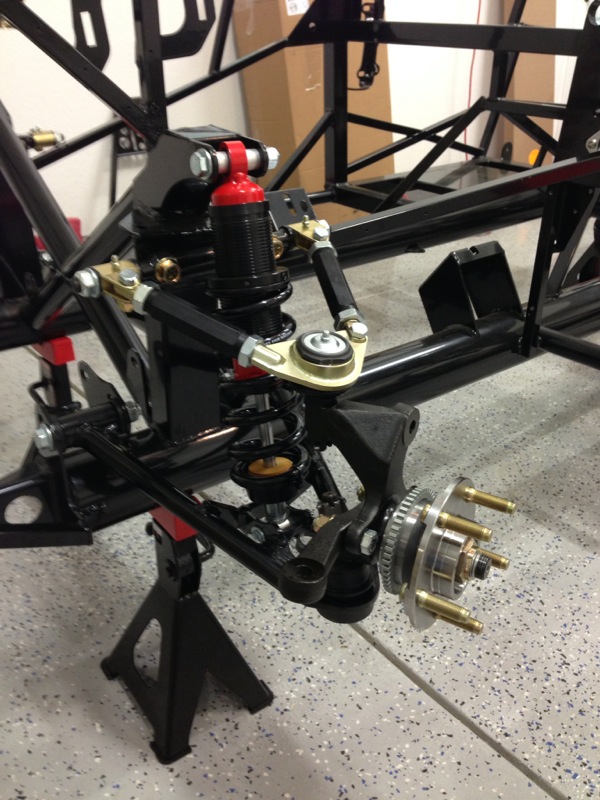
After finishing the work on the diff and the spindles I got busy on the pedal box for the brake and clutch pedal. In the pic below, you’re looking at the drive side of of the car. The silver triangular piece or the clutch quadrant is where the clutch cable connects. It will come through that hole on the left side and lay in that grove on the top of the quadrant. The pedal, when depressed, will rotate that quadrant clockwise, pulling on the cable and thus disengage the clutch. Assuming of course I hook it all up and adjust it correctly.
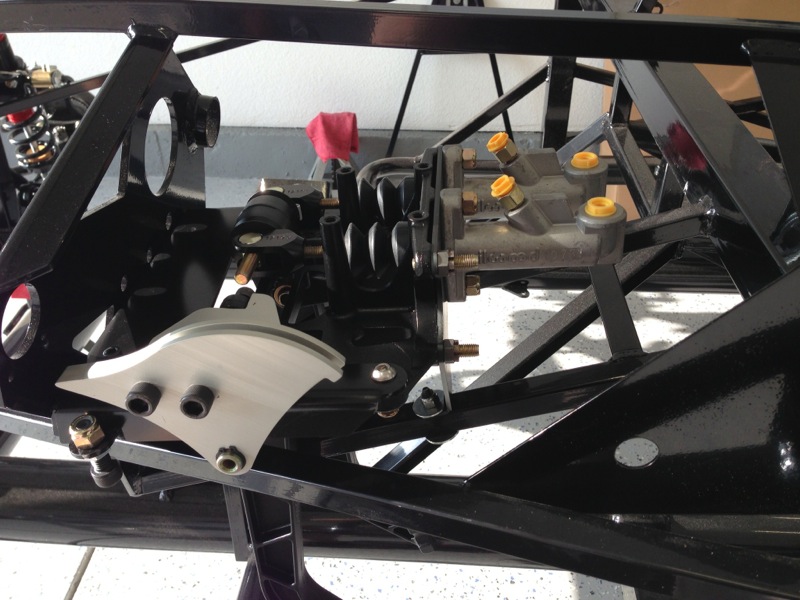
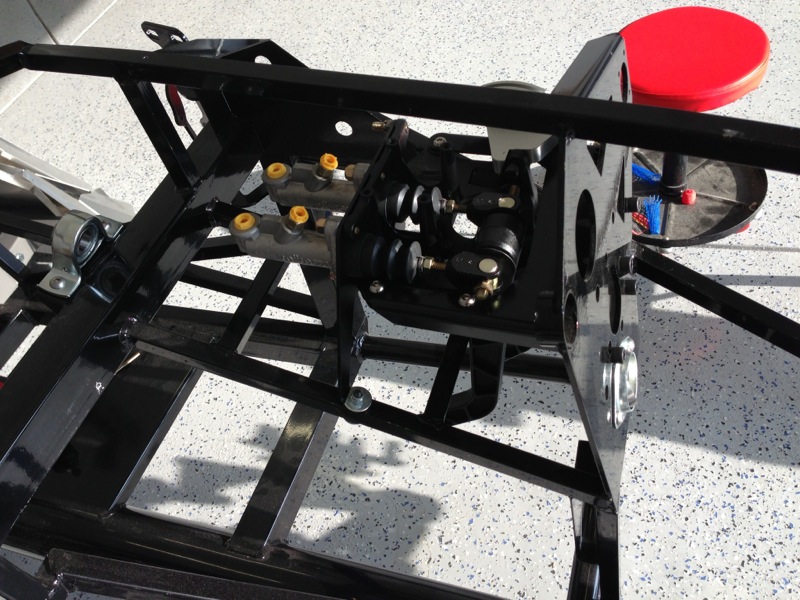
The pic below is from the passenger side and you can see the 2 master cylinders for the brakes, Just left of center, each one has 2 yellow caps on it. One is for the front and one for the rear brakes. You can also see them in the pic above slightly right of center.
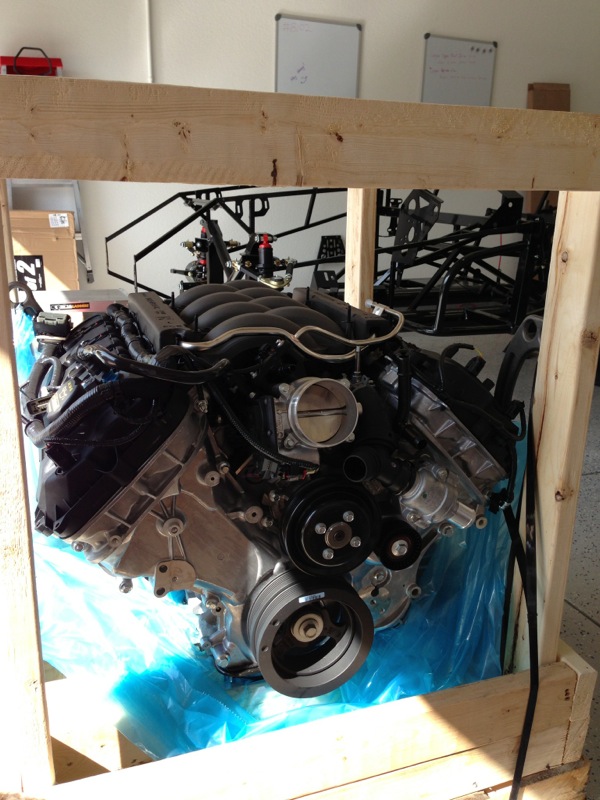
Oh yea one other thing, I got a delivery on Friday. A big, heavy, brown box from Ford Racing, delivered by the friendly FedEx driver. I wonder what could be in there? Ok next week maybe I’ll open that box………………………..just kidding.

Ummmmm, something they felt needed to be wrapped in a massive amount of blue plastic and packing tape.
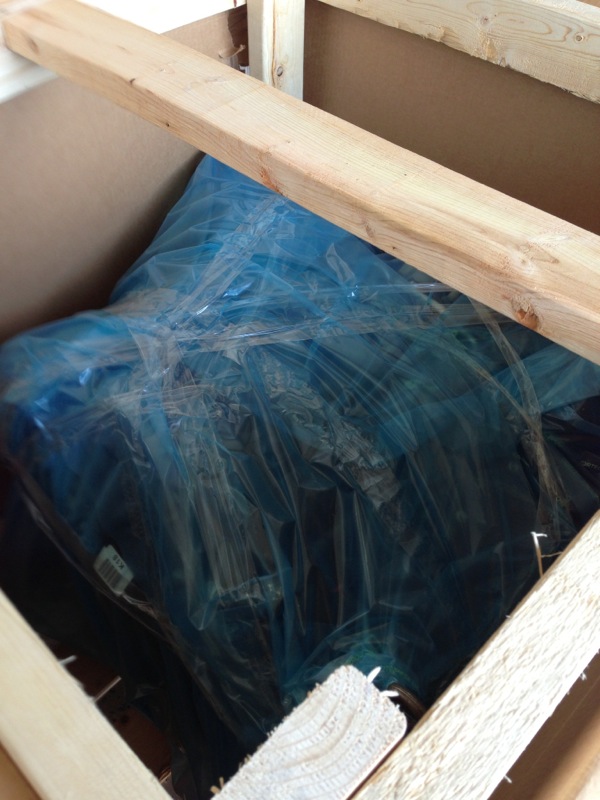
Oh that’s what it is, the engine. That’s the 5.0L Coyote engine. It’s a twin overhead cam, 4 valve per cylinder, fuel injected, all aluminum V8 that generates 420 horsepower and 390 foot pounds of torque. You’re looking at the front of the engine. Someone said it had speeding ticket written all over it, I stared, gaped, peered, gawked and ogled it for quite some time this weekend and I never saw it. Hmmmm I wonder what they we’re talking about – Oh well Vrooom Vrooom.
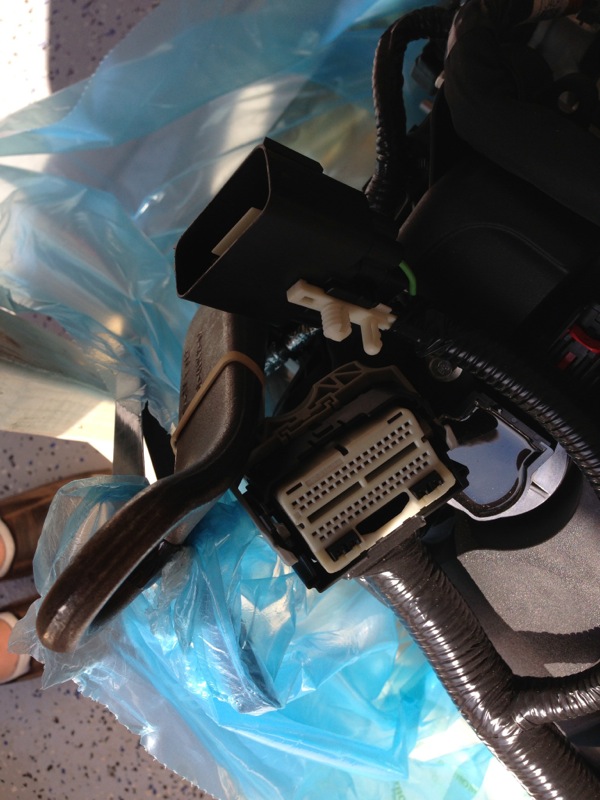
Well that doesn’t look like an Ethernet port. 😮 I guess I better figure out what that plugs into. No worries I’m on it.
That’s if for this week, lots more stuff to come, stay tuned and hope you’re enjoying it, I’m having a blast.
Like Legos for grown-ups lol
Randy, You are making fantastic progress! I like it so much I might have to trade in one of my bikes for a similar project. Keep the updates coming.
Mike
Randy – regarding the rear end your putting in (3.55 posi) – have you calculatedd outputshaft-max-rpm:gearing (3.55):tire-od-size to get a rough guestimate as to what you expect to top out at based on that coyote motor redline? Just interested if this is a buck-forty car or if those gears are going to hold you down in the buck-twenties?
I ran the numbers through one of the various calculators and the results say it’s north of a buck-forty. I think I now know where that ticket might be.
Great progress! I love the kit and it looks like you are having fun and getting it done. Curious to see where you are towards end of summer. It looks very clean and squared away. This project is something I’ve always wanted to do but not sure I could take on. Right now I have too many house chores 🙁 once I get them done then maybe a chance. Look forward to seeing more!
Randy –
That looks great! Nice choice of engine, too!
Jack
Nice progress. Things are looking great. You work fast. When mine arrives Saturday, I hope to do as well. Did you end up ordering your coyote from FRPP?…or did you go with a coyote from Roush? From what Mark Yagelo said at the class, I got the impression they sold the coyote for the same price and would ship it for free. Again, good job. Keep up the good work.
Terry,
I actually ended ordering it from Summit Racing. When I spoke with Mark I had already ordered the tranny and some other parts through Forte, who will also sell you the crate engine, and Mark said if I didn’t order the whole package I wouldn’t get the free shipping. When I checked with Summit they give free shipping on anything over $99 including engines. Crazy thing is I ordered it on a Tuesday evening and it showed up that Friday, they didn’t waste anytime getting it out.