
Getting Hosed.
No not in the bad way. Last weekend before taking off to Atlanta for SCTE EXPO I got a chance to run the fuel lines and some of the fuel hoses. As for the hoses I’m running Braided Stainless Steel hoses to go with the Stainless Steel hard lines. If you have been following the build you’ve heard me talk about them before. All of the fuel line fittings will be the 37º AN-6 fittings. So to start I ran the hard lines first. The pic below shows the 2 lines running along the rear down tube on the passenger side. This is right behind the passenger seat but on the outside of the car in the wheel well. You can see one of the cockpit panels on the right. On the left side you can see the differential. The lines run underneath the car along one of the main...
The Great Pumpkin

With Halloween right around the corner I couldn’t resist. The differential is also referred to as the pumpkin so now you know. So the diff went in this weekend. I got it back from Lou’s on Friday, Lou took care of rebuilding it for me. I decided that I would be better off letting Lou take care of it since he has all the right tools and experience. Now getting it installed was a whole other thing. For the first couple of hours it seemed like a classic case of square peg-round hole. The install manual says it comes up from the bottom, pinion first with axle holes aligned front to back. As you can see in this first pic, given the weight of the unit about 45 pounds I used my engine hoist so I didn’t have to worry about it falling on my head and...
Flare Time – Part Deux
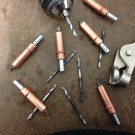
So I got my new flaring tool and boy is it nice, makes a perfect 45º inverted flare every time. It’s a really nice pro tool and lives up to what everyone online said about it. It makes a perfect flare every time. Only problem is, turns out stainless is really hard to flare and every flare I tried on the stainless tubing resulted in a crack in the flare. To make sure I wasn’t doing something wrong I used the same procedure on the regular steel lines and had a perfect result. So after much trial and error as you can see in the pic below and that’s only half of the bad ones. So perfect flares, no broken tool but still a cracked line. Hmmmmm what to do. Off to Google I go and after some digging I found a tip that suggests slightly heat the...
Flare time or maybe not
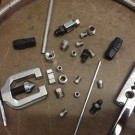
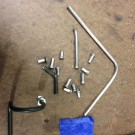
Well this weekend I was looking forward to finally getting to start to run the fuel and brake lines. Most of the stuff I need has arrived, fittings, tubing, adapters and the flaring tool. I already have a flaring tool but since I’m running Stainless Steel lines I needed a tool that was able to handle the harder stainless lines. To make things more complicated there are really 2 main options when it comes to flares. There is the double inverted 45° flares which you will find on just about every production vehicle. And then there is the 37º AN type flare, you will find these on aircraft and in the car world they are the red and blue fittings used with stainless steel braided hoses that you see on many hotrods. The pic below is an example. For the trivia buffs...
Drill, Drill, Drill……………..And then Drill some more.
This last weekend and over the Labor Day Weekend it was all about getting the majority of the panels fitted. This included the driver side footboxes, passenger side footboxes and about all of the panels in the cockpit. It involved lots of fitting to ensure alignment, marking holes for rivets and then drilling and more drilling and more drilling and I think you get the point. Fortunately, Destinée was there to lend a hand and we got it mostly done. As for the number of holes we drilled we lost count somewhere after 500 holes. Some of the holes secure the panel to another panel while some connect to the frame. None of them are actually riveted at this point but just held in place with the Cleco’s to help with alignment. The panels visible in the engine...
Overdue Progress and Update
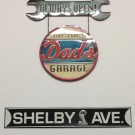
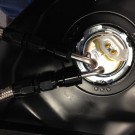
It’s been a while since I’ve posted an update and that’s mostly because we’ve been busy with a few other things and I haven’t had the time to work on the car. ;-( Sad I know. Nevertheless, I got a good solid day in yesterday and made some good progress in multiple areas. First I need to say thanks to my lovely wife and daughter for nailing it with my birthday gifts. And here they are hung in the garage, perfect choice to fill that blank space on the walls. Adds a nice touch to the garage. Ok, Destinee and I started working on the gas tank while we waited for the rear suspension parts. We got the sensor for the gas gauge and the pump installed. When we went to install the pump we immediately ran into a problem. Just a small one...
Recent Comments