
Drill, Drill, Drill……………..And then Drill some more.
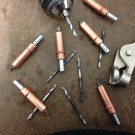
This last weekend and over the Labor Day Weekend it was all about getting the majority of the panels fitted. This included the driver side footboxes, passenger side footboxes and about all of the panels in the cockpit. It involved lots of fitting to ensure alignment, marking holes for rivets and then drilling and more drilling and more drilling and I think you get the point. Fortunately, Destinée was there to lend a hand and we got it mostly done. As for the number of holes we drilled we lost count somewhere after 500 holes. Some of the holes secure the panel to another panel while some connect to the frame. None of them are actually riveted at this point but just held in place with the Cleco’s to help with alignment. The panels visible in the engine...
Overdue Progress and Update
It’s been a while since I’ve posted an update and that’s mostly because we’ve been busy with a few other things and I haven’t had the time to work on the car. ;-( Sad I know. Nevertheless, I got a good solid day in yesterday and made some good progress in multiple areas. First I need to say thanks to my lovely wife and daughter for nailing it with my birthday gifts. And here they are hung in the garage, perfect choice to fill that blank space on the walls. Adds a nice touch to the garage. Ok, Destinee and I started working on the gas tank while we waited for the rear suspension parts. We got the sensor for the gas gauge and the pump installed. When we went to install the pump we immediately ran into a problem. Just a small one...
Something a little different
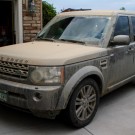
So today we went off-roading with the Land Rover dealership. We went up to a place called Kingston Peak, we had a blast. The mountain views were amazing. It was a pretty rocky trail and the only victims were about 5 tires. Unfortunately, 2 of them were on the the same Range Rover, one of the perils of off-roading. We got ours really dirty, it was probably the mud puddles we went through about 10 times. What can I say it was a blast. Fortunately we didn’t have any problems, in the end everyone had a good time. Enjoy the slide show. You can click on an image for a larger version.
Steering Rack and Diff
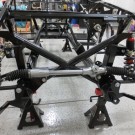
Well I didn’t get as much done today as I would have liked and tomorrow we are going out with the Land Rover group to do some off-roading. I did get the steering rack installed. You would think it seems like a pretty straight forward install, after all there’s only 2 bolts holding the thing on. It would have been if the passenger side holes in the mounting bracket had been lined up. Nope, so I had to carefully drill them out slightly. This involved putting the rack in and taking it out multiple times to get everything lined up. After that it was just a matter of getting the spacers right and then getting the rack centered. You can see it in the pic below as the silver part in front of the X member on the frame. In this pic you can see the steering arm...
Front Suspension, Diff, Pedal Box
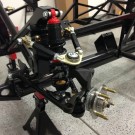
Well it was a busy weekend and I got a bit done, so strap yourself in this is a long one. First off, the front suspension is done as you can see below, trust me the other side is done also. Here you see the drivers side front suspension. It consists of the upper and lower A arms, the coil over shock (the red shock with the spring wrapped around it in the center), the spindle and hub (the part in the bottom right corner with the goldish bolts, or wheel studs sticking out of it). What’s not on there yet are the brakes as they are still on order. It’s also not connected to the steering rack yet but that’s another step. In case you’re wondering what the ring, looks like a gear, behind the hub is – it’s the tone ring for...
Recent Comments